Google Photos is a fantastic app that allows you to store and organize your photos and videos. But, have you ever thought about what would happen if you lost your phone or accidentally deleted your photos? That’s where backup comes in.
Backing up your photos means creating a second copy of them so that if something happens to the original, you won’t lose them forever. In this article, we will be discussing how to backup only photos in Google Photos, so you can be sure that your precious memories are safe.
Below are the steps to backup only photos in Google Photos:
Step 1: Download Google Photos
The first step is to download Google Photos on your phone. You can do this by going to the App Store (for iPhones) or the Google Play Store (for Android phones) and searching for “Google Photos”. Once you have found the app, simply download and install it on your phone.
Step 2: Turn off Wifi usage on the Mobile
To Backup only photos not videos on Google Photos you need to turn off wifi before starting the backup and only use mobile data to take backup on Google Photos.
Step 3: Open Google Photos
Once you have downloaded the app, open it and sign in to your Google account. If you don’t have a Google account, you will need to create one to use Google Photos.
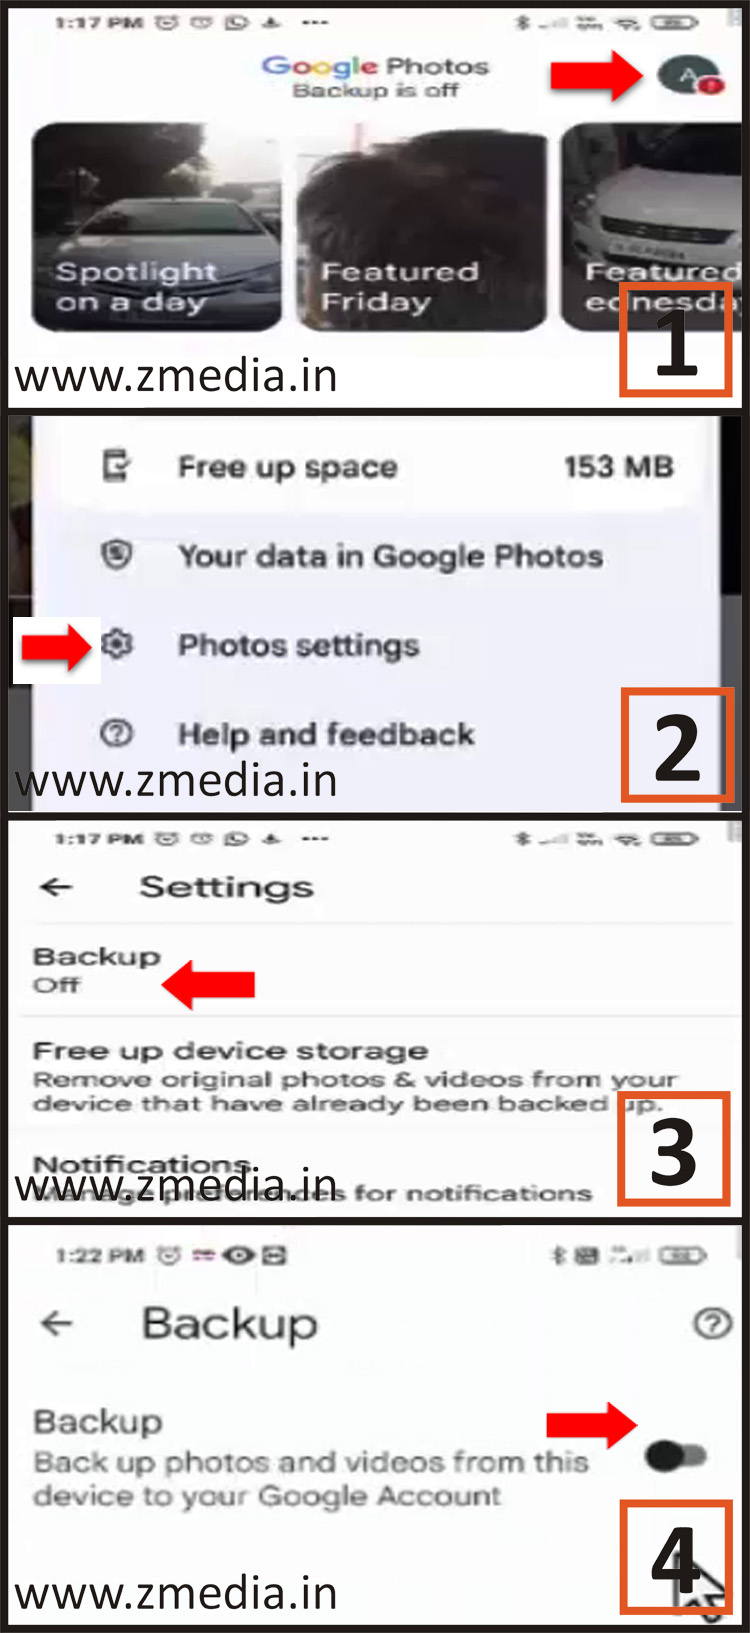
Step 4: Turn on Backup
The next step is to turn on backup for your photos. To do this, click on the profile picture in the top right corner of the screen to open the menu. Then, select “Photos settings” and then “Backup”. From here, you can turn on backup for your photos by toggling the switch to the right.
Step 5: Turn on Mobile Data usage and Turn off Backup Videos over data
Here select a daily limit for mobile data usage you can select 30 MB or unlimited. To only backup photos in Google Photos, you need to Turn off backup videos over data.
Step 6: Choose Folders to Backup
By default, Google Photos will backup all the photos on your phone. However, if you only want to backup certain folders, you can choose which ones to backup. To do this, click on “Back up device folders” and select the folders you want to backup.
Step 7: Free up Space on your Phone
After your photos have been backed up to Google Photos, you can free up space on your phone by deleting the original photos.

For more information see the below video:
How to Backup Only Selected Photos in Google Photos
Google Photos is a great app for backing up your photos and keeping them safe in the cloud. It allows you to store photos and videos for free. But what if you only want to back up selected photos? Maybe you have some photos that are too personal to share, or some that you simply don’t want to keep in the cloud. In this article, we’ll guide you through the process of backing up only selected photos in Google Photos.
Below are the steps to backup only selected photos in Google Photos:
Step 1: Open the Google Photos App
The first step is to open the Google Photos app on your Android device. You can do this by tapping on the app icon from your home screen or app drawer. Once you’re in the app, navigate to the photos you want to backup.
Step 2: Select Photos
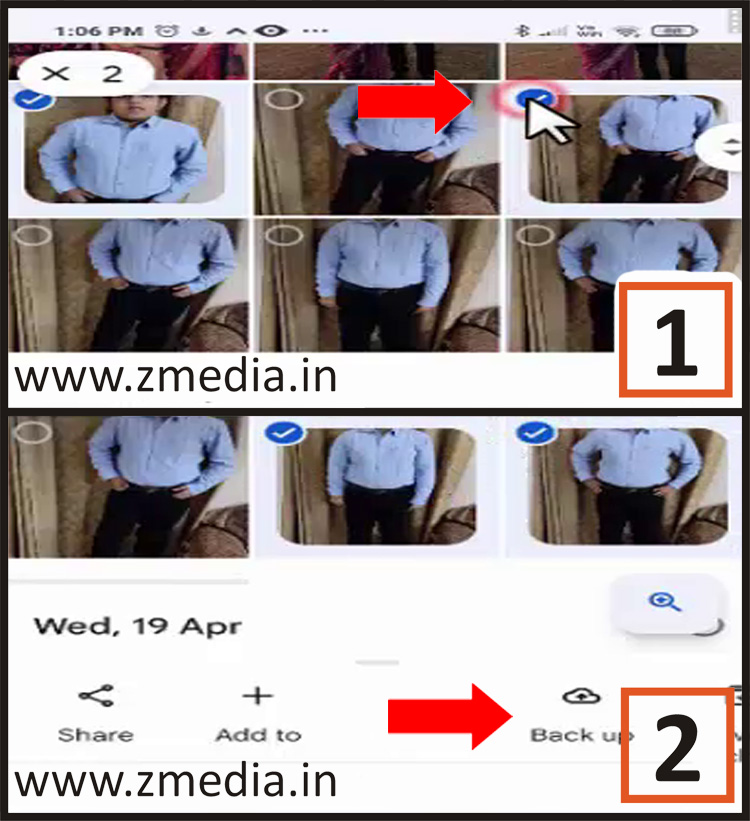
Once you’ve found the photos you want to backup, you need to select them. You can do this by tapping and holding on one photo, and then tapping on the others you want to select. A blue checkmark will appear on the selected photos.
Step 3: Choose Backup
Once you’ve selected the photos you want to backup menu options will pop up, select “Back up”. The selected photos will be uploaded to your Google Photos account and will be backed up in the cloud.

For more information see the below video:
How to Backup Only Videos on Google Photos
Google Photos is a great tool for backing up your photos and videos. It automatically backs up all your photos and videos to the cloud, making it easy to access them from anywhere. However, sometimes you may only want to back up your videos and not your photos. In this article, we’ll show you how to back up only videos on Google Photos.
Below are the steps to backup only videos on Google Photos:
Step 1: Open the Google Photos App
The first step is to open the Google Photos app on your Android device. You can do this by tapping on the app icon from your home screen or app drawer. Once you’re in the app, navigate to the videos you want to backup.
Step 2: Select Videos
Once you’ve found the videos you want to backup, you need to select them. You can do this by tapping and holding on one video, and then tapping on the others you want to select. A blue checkmark will appear on the selected videos.
Step 3: Choose Backup
Once you’ve selected the videos you want to backup menu options will pop up, select “Back up”. The selected videos will be uploaded to your Google Photos account and will be backed up in the cloud.
For more information see the below video:
How to Stop Google Photos Backup on Android
Google Photos is a popular app for storing and organizing photos on Android devices. It’s a great way to ensure that your photos are backed up and safe, but sometimes you may want to stop the backup process. Whether you’re running low on storage space, or you simply want to stop the app from uploading your photos, this article will guide you through the process of stopping Google Photos backup on Android.
Below are the steps to stop Google Photos Backup on Android:
Step 1: Open the Google Photos App
The first step is to open the Google Photos app on your Android device. You can do this by tapping on the app icon from your home screen or app drawer. Once you’re in the app, navigate to the main menu by tapping the Profile Picture in the top-right corner of the screen.
Step 2: Go to Settings
Once you’re in the main menu, select “Photo Settings”. This will bring up a list of options related to your Google Photos account.
Step 3: Choose Backup
From the list of options, select “Backup”. This is the section of the app where you can manage the backup settings for your photos and videos.
Step 4: Disable Backup
To stop Google Photos backup on Android, simply toggle the “Backup” option to the “Off” position. This will stop the app from uploading any new photos or videos to your Google Photos account. You can turn it back on at any time by toggling the switch to the “On” position.
For more information see the below video:
In conclusion, backing up your photos is an essential step in protecting your precious memories, and Google Photos makes it easy to do so. By following the simple steps outlined in this article, you can ensure that your photos are safely stored in the cloud and accessible from anywhere.
Remember to turn off Wi-Fi usage and turn on mobile data usage, select which folders to backup, and turn off backup for videos to backup only photos. Once your photos are backed up, you can free up space on your phone by deleting the original photos.