In a world where technology plays a vital role in communication, mastering the art of email is a valuable skill. Gmail, one of the most popular email platforms, offers a feature that can be a lifesaver when it comes to managing your messages: scheduled emails. But what happens when you change your mind about a scheduled email? Fear not! In this guide, we’ll walk you through the simple steps to cancel scheduled emails in Gmail.
Below are the steps to Cancel Schedule Emails in Gmail.
Step 1: Open Your Gmail Account
To begin your journey into the world of canceling scheduled emails, open your Gmail account. You can do this by visiting the Gmail website or launching the Gmail app on your smartphone or tablet.
Step 2: Locate the “Scheduled” Section
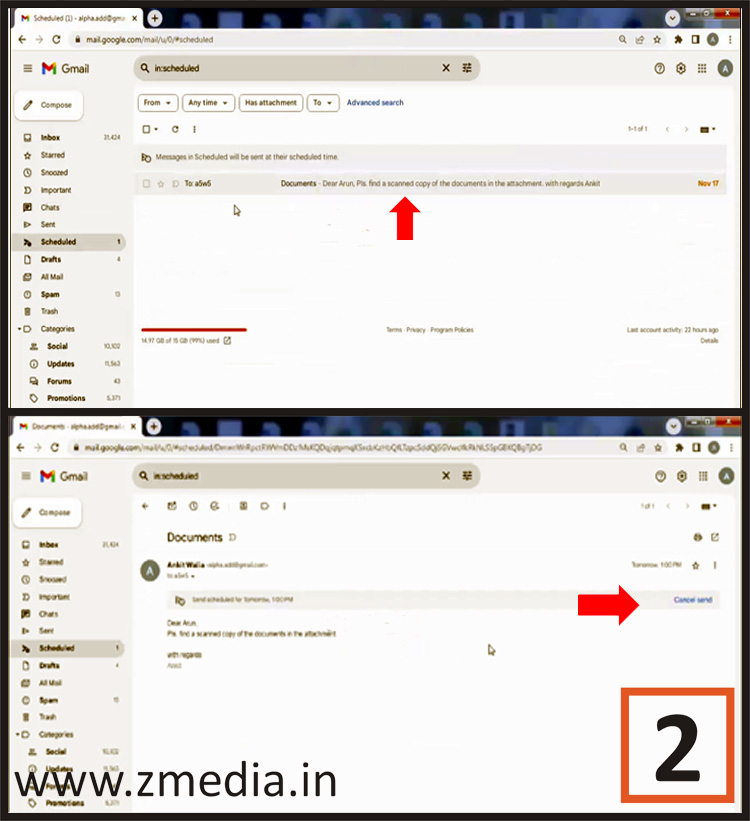
Once you’re in your Gmail account, look for the “Scheduled” section. This is where all your scheduled emails are neatly organized, waiting for their designated time of sending.
Step 3: Open the Scheduled Email
Find the email you want to cancel and open it. Gmail conveniently displays all your scheduled emails in a list format, making it easy to navigate and manage your pending messages.
Step 4: Click “Cancel Send”
Now open the email and look for the “Cancel send” option. It’s usually located near the top of the email, close to the subject line. Clicking on this option will halt the scheduled delivery of your email.
Step 5: Confirm Your Decision
A small pop-up window will appear, asking you to confirm your decision to cancel the email. If you’re sure you want to cancel the scheduled email, click “Cancel send” once again.
Now the scheduled email is canceled and the email will open for editing, after editing you can send or again schedule the email.

For more information see the below video:
In conclusion, mastering the art of canceling scheduled emails in Gmail is a valuable skill that empowers you to navigate the ever-evolving landscape of digital communication. By following these simple steps, you can ensure that your messages are sent out precisely when you want them to be.


